M5Stack CoreMP135: Exploration and Development

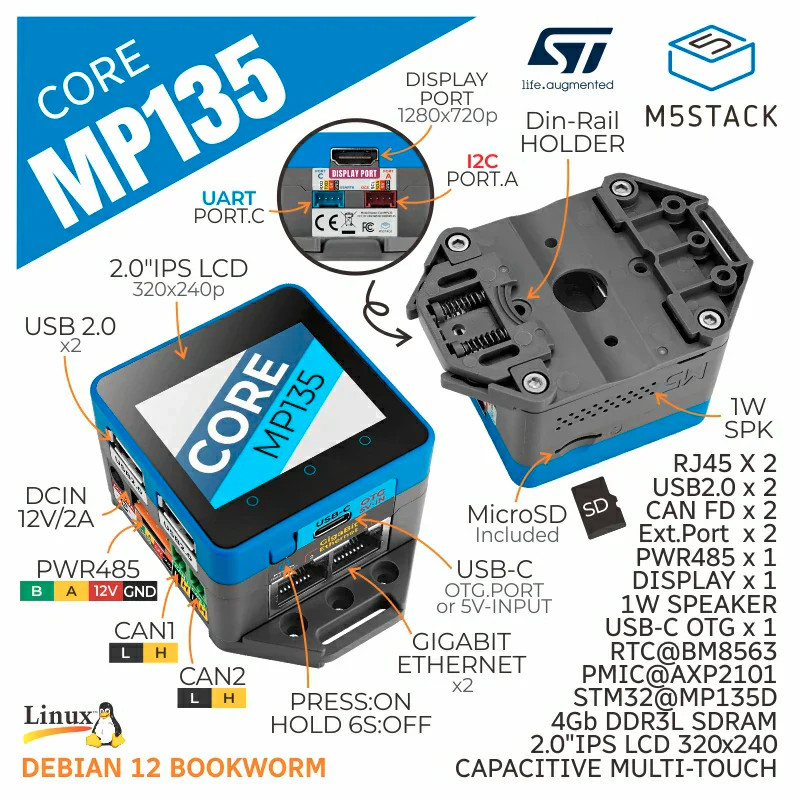
The M5Stack CoreMP135 w/ STM32MP135D is a versatile little DevKit recently released by M5Stack at the $75 price range. I’m a big fan of M5Stack and have purchased many of their kits over the years, with each kit being versatile enough to have served for 10+ projects each over it’s lifetime without issue.
Fundamentally, I see M5Stack kits as “I want to do embedded dev and am willing to pay $20-40 extra to get an all-in-one kit that just works”. That of course wont fit everyone’s usecase, but I find that whenever a new project spings to mind I can just… grab an M5Stack kit off the shelf and get started doing the thing. If you find yourself hitting the roadblock of “just doing the thing” more than once a year, just… pay the little extra for the DevKits and it’ll pay for itself in time wasted.
Historically, M5Stack kits have primarily been Espressif system on chip (SoC) based such as ESP32, ESP32-S3, etc… That’s part of what got me so excited about the new CoreMP135! It’s an All-In-One mini computer running on an ARM CPU.
Why not just get a Raspberry Pi?
A Raspberry Pi does have more than just a single CPU core, has more RAM, and can run full debian linux, but a raspi is just a board.
By the time you add enough GPIO hats and LCD’s and external NIC’s to a Raspi to even come close to the M5Stack CoreMP135… you’ve created some hellish frankenstein thing for a DIY project held together with jumper wires and hot glue that doesn’t fit in the fancy $40 metal case with built-in fan you paid for.
Just buy a CoreMP135 instead… probably!
Flashing and Initial Setup
When unboxing the CoreMP135 it has a pre-flashed 32GB MicroSD card. I have no idea what’s on it, didn’t even bother to check, aint nobody got time for that.
The M5Stack Docs can be a little difficult to navigate, but it’s all there. Buildroot and Debian builds are available to download here:
Following the instructions, I flashed M5_CoreMP135_debian12_20240418 using Balena Etcher, connected an ethernet cable to the “Ethernet 1” port on the device, inserted the newly flashed MicroSD card, and booted the device.
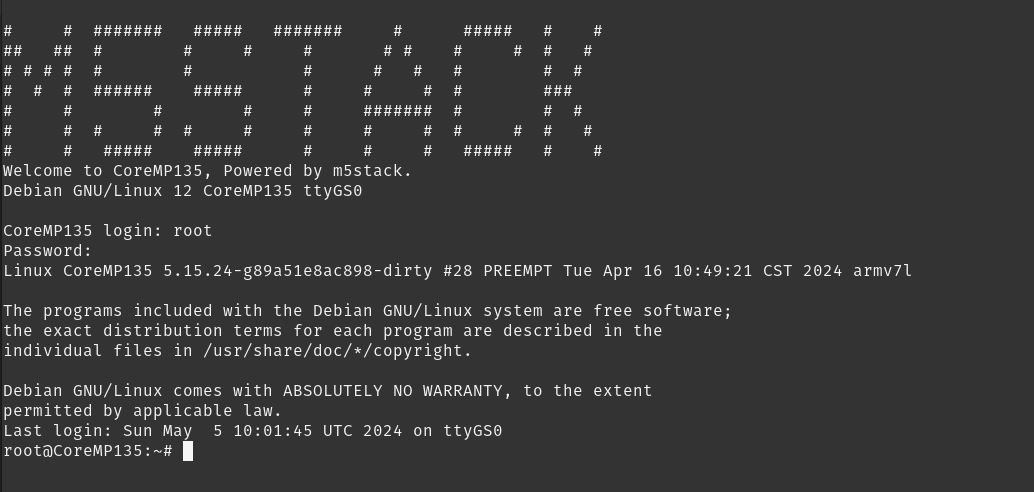
Booting
Booting was as simple as connecting a power source via USB-C. The LCD displays a diagonal “CORE / MP135” instantly. After ~30 seconds a (perhaps overly loud) dah-dah-dah audio clip plays through the builtin 1W speaker. After this, visually observable differences in the device cease.
Connecting
After peeking around a few bits of documentation and having a bit of history with their devices, I run ls /dev and see that the tty device at /dev/ttyACM0 is now available.
(I may already have the necessary UART drivers installed as part of a stock Ubuntu installation, your milage may vary on Windows/Mac)
If you do not already have screen installed, a simple apt install screen will take care of that for you, after which you can simply:
screen /dev/ttyACM0 115200
And login with credentials root:root.
If you prefer to connect over SSH/SFTP/SCP, great news! You CAN!
But not on the first boot. Wait for the dah-dah-dah audio tone, press and hold the power/reset switch for 6 seconds to poweroff, and click it once to boot again.
It will now show up on your wired network under the mDNS name CoreMP135, which you can SSH with the same root:root credentials.
ssh root@CoreMP135 will probably automatically find the correct host on most networks.
Quick Tweaks
By default, the 32GB microSD card is not fully utilized and is only a 1.1GB filesystem.
root@CoreMP135:~# df -h
Filesystem      Size  Used Avail Use% Mounted on
/dev/root       1.1G  857M  171M  84% /
devtmpfs        142M     0  142M   0% /dev
tmpfs           221M     0  221M   0% /dev/shm
tmpfs            89M  716K   88M   1% /run
tmpfs           5.0M     0  5.0M   0% /run/lock
tmpfs            45M     0   45M   0% /run/user/0
Follow the steps here to resize the root filesystem to the full space:
root@CoreMP135:~# df -h
Filesystem      Size  Used Avail Use% Mounted on
/dev/root        30G  2.5G   26G   9% /
devtmpfs        142M     0  142M   0% /dev
tmpfs           221M     0  221M   0% /dev/shm
tmpfs            89M  720K   88M   1% /run
tmpfs           5.0M     0  5.0M   0% /run/lock
tmpfs            45M     0   45M   0% /run/user/0
To brag about my freshly booted smol device, I want to run neofetch, so I do a quick apt update and…
Wow that’s slow! Almost certainly because I’m in the US, and the apt mirror is configured as https://mirrors.ustc.edu.cn/debian in China.
I visit https://www.debian.org/mirror/list and pick a mirror with architectures supporting armhf for this board, in my case ftp.us.debian.org/debian/.
Then I replace change /etc/apt/sources.list from:
deb https://mirrors.ustc.edu.cn/debian bookworm main
to
deb http://ftp.us.debian.org/debian bookworm main
Note the dropping of the “s” from “https” as well. Without that, an apt update will give certificate errors. I don’t have any reason to believe this is malicious in nature, I’ve seen this before on systems with outdated ca-certs packages. The packages from “http://” are also signed anyways, I don’t care to investigate at the moment, it’s a non-issue in practice. This is a problem for future me to care about, moving on.
root@CoreMP135:~# apt update
Get:1 http://ftp.us.debian.org/debian bookworm InRelease [151 kB]
Get:2 http://ftp.us.debian.org/debian bookworm/main armhf Packages [8498 kB]
Get:3 http://ftp.us.debian.org/debian bookworm/main Translation-en [6109 kB]
Fetched 14.8 MB in 21s (711 kB/s)
Reading package lists... Done
Building dependency tree... Done
Reading state information... Done
45 packages can be upgraded. Run 'apt list --upgradable' to see them.
I ran a apt upgrade -y to upgrade all packages, rebooted, and no issues occurred, which is a rarity for many embedded linux devices. We’re now “fully” up to date.
Do something a little crazy!
I install 150mb of packages with apt install neofetch on this tiny SoC, because why not. Everyone does it and it makes for a good screenshot.
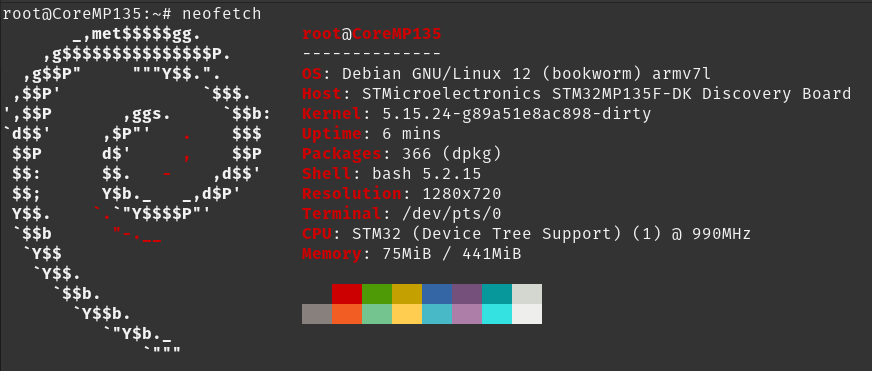
Indeed! Despite the resolution being reported as 1280x720, that’s the resolution for the HDMI port which I’ve not plugged anything into.
Let’s develop something that uses the builtin 320x240 LCD! M5Stack Docs have a detailed cross-compilation document for using their M5Stack_Linux_Libs and scons here:
The docs appear complete and detailed, but I wouldn’t know, I didn’t read them.
Diving directly into the source code for one of the example applications I can see that the builtin LCD is available as a Linux Framebuffer:
And I can see that the framebuffer for the bulitin 320x240 LCD is available at /dev/fb1 here:
A bit more reading reveals that it accepts RGB565 colors to the framebuffer. Sweet, let’s immediately go off the beaten path.
Do something a lil more whack!
I install the latest Go compiler directly on the M5Stack and bypass those pesky SSL certificate warning I don’t care to solve yet with and also because 512mb of RAM is still plenty of memory as I will shortly demonstrate.
apt install wget -y
wget --no-check-certificate http://go.dev/dl/go1.22.3.linux-armv6l.tar.gz
rm -rf /usr/local/go && tar -C /usr/local -xzf go1.22.3.linux-armv6l.tar.gz
echo 'export PATH=$PATH:/usr/local/go/bin' >> ~/.bashrc
source ~/.bashrc
Bam.
root@CoreMP135:~# go version
go version go1.22.3 linux/arm
Oh hey! Check this out:
That’s a Go module for opening Linux framebuffers such as /dev/fb1 and drawing RBG565 images to it!
Repurposing some animation code I had laying around for a water animation I end up with the following:
package main

import (
	"image"
	"image/draw"

	"github.com/gonutz/framebuffer"
)

const (
	screenWidth  = 320
	screenHeight = 240
	cols         = 320
	rows         = 240
	damping      = float32(0.95)
)

var (
	current  = [cols][rows]float32{}
	previous = [cols][rows]float32{}
)

func init() {
    //Setup
	for i := 0; i < cols-1; i++ {
		for j := 0; j < rows-1; j++ {
			current[i][j] = 0
			previous[i][j] = 0
		}
	}
    //Drop the initial "water" drop, and then let render loop handle the rest
	previous[screenHeight/2][screenWidth/2] = 255
}

func main() {
    //The builtin LCD
	fb, err := framebuffer.Open("/dev/fb1")
	if err != nil {
		panic(err)
	}
	defer fb.Close()

	noiseImage := image.NewRGBA(image.Rect(0, 0, screenWidth, screenHeight))

	//Render loop
	for {
		//Kernel Math for simple water animation
		for i := 1; i < cols-1; i++ {
			for j := 1; j < rows-1; j++ {
				current[i][j] = (previous[i-1][j]+previous[i+1][j]+
					previous[i][j-1]+previous[i][j+1]+
					previous[i-1][j-1]+previous[i-1][j+1]+
					previous[i+1][j-1]+previous[i+1][j+1])/4 - current[i][j]

				current[i][j] = current[i][j] * damping
				index := (i + j*cols) * 4

				noiseImage.Pix[index+0] = 0
				noiseImage.Pix[index+1] = 0
				noiseImage.Pix[index+2] = uint8(current[i][j] * 255)
				noiseImage.Pix[index+3] = 255
			}
		}
		//swap
		temp := previous
		previous = current
		current = temp
		//draw
		draw.Draw(fb, fb.Bounds(), noiseImage, image.ZP, draw.Src)
	}
}
The end result is… high unoptimized. I’m writing the entire frame buffer as an image every loop, and yet… it works!