Adventures in Bluetooth: Part 2

Where last I left off in Adventures in Bluetooth: Part 1, I was originally attempting to flash custom firmware to a Fitbit Charge 2 smartwatch and ended up taking a quite large side-quest. Let’s see how far I can make it towards the objective this time!
A quick recount of the tools in my arsenal:
- A fitbit Charge 2 with firmware that’s ~1 year out of date
The idea being to intercept the firmware flashing process and attempt to take a peek inside.
- An non-rooted Android Phone (Moto g(7) Play)
Used for running the Fitbit companion app and reading Bluetooth HCI logs of the communications.
- A Kaitai Struct BTSNOOP Parser
Used for parsing the Bluetooth HCI logging format retrieved from Android phones.
- A
BCM20702A0 Bluetooth 4.0Bluetooth USB dongle
Used for programmatic interaction with Bluetooth Low Energy (BLE/BTLE) using the Tinygo bluetooth library.
And you may ask yourself, “Well, how did I get here?”
- No idea, let’s move on.
Mapping the protocol from the other direction
I’ve done a decent amount of legwork so far to monitor and parse the bluetooth traffic being transmitted by the Fitbit Android app. The main idea being that as part of the pairing process between the app and the watch a 4-digit pin is required.
I ented the pin incorrectly several times and recorded the traffic and saw some patterns in the traffic!
Now, as soon as I enter the correct pin for the pairing process it’s going to attempt to download the newest firmware. I don’t want that!
How can I test that my understanding of the protocol is sufficient and accurate? Emulate the connection from the other side of course!
This should (in theory) allow me to map the protocol step-by-step from both directions while still remaining in control of the update process.
| Real Device | Faked Device | |
|---|---|---|
| Android Phone | ↔ | ESP32 “SmartWatch” |
| Fitbit Charge 2 | ↔ | BCM20702A0 Bluetooth 4.0 Dongle |
Emulating a Smartwatch’s BTLE interfaces with an ESP32
I have a couple of M5Stack laying around not doing much, so I figured I’d put one to use. It contains an ESP32 which has a broad range of capabilities, including Bluetooth Low Energy.
These boards can be programmed with a variety of programming languages, but I’ve been a little rusty on my C lately, so I’ll be using the C-Style syntax for Arduino.
Here’s a scan of the real Fitbit Charge 2 using the bluetooth debugging app nRF Connect. This is what I need my ESP32 M5Stack to look like…
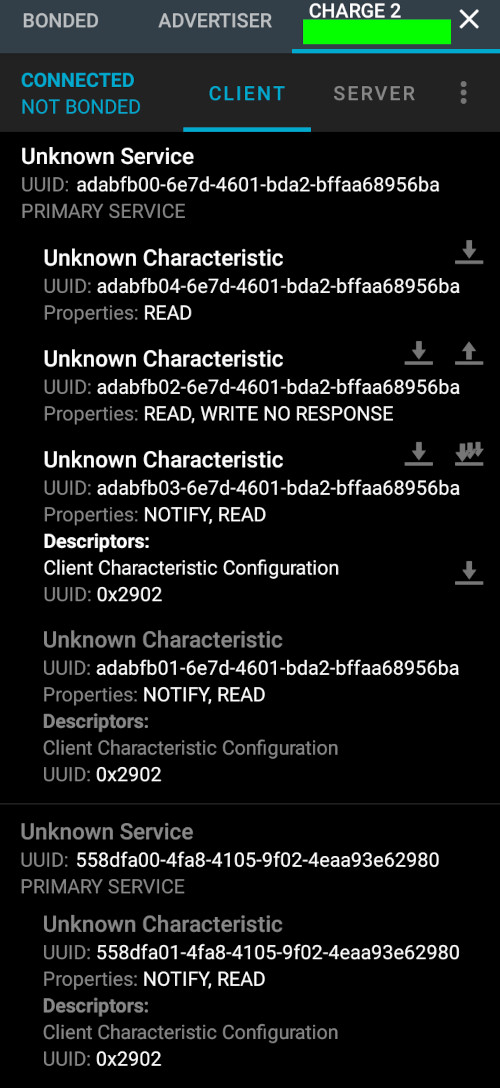
Since it looks like it’s organized like a tree, I’ll start at the top and create a Bluetooth server, Services, Characteristics, etc…
Notable things I learned while writing the following code include the following:
Only have one BLE server on an ESP32.
BLECharacteristic’s are just bitfields. If you need to have bothREADandNOTIFYon a Characteristic, you can just perform the logical OR operation on them and use the resulting value.You can spoof the Bluetooth MAC address of an ESP32 easily by changing the base_mac. The
base_macis used to calculate the MAC addresses of various interfaces by adding +1 to the last octet, with Bluetooth being +2 to the last octet of thebase_mac.
/*
 Impersonate a Fitbit Charge 2
*/
#include <M5Stack.h>
#include <BLEDevice.h>
#include <BLEServer.h>
#include <BLEUtils.h>
#include <BLE2902.h>
#include <esp_system.h>

BLEServer *pServer0 = NULL;
BLECharacteristic *pCharacteristic0_0;
BLECharacteristic *pCharacteristic0_1;
BLECharacteristic *pCharacteristic0_2;
BLECharacteristic *pCharacteristic0_3;
BLECharacteristic *pCharacteristic1_0;
bool deviceConnected = false;
bool oldDeviceConnected = false;
uint8_t txValue = 0;
uint8_t spoofMac[] = {0x00, 0x00, 0x00, 0x00, 0x00, 0x00};

#define SERVICE_UUID0 "ADABFB00-6E7D-4601-BDA2-BFFAA68956BA"
#define CHARACTERISTIC_UUID0_0 "ADABFB04-6E7D-4601-BDA2-BFFAA68956BA"
#define CHARACTERISTIC_UUID0_1 "ADABFB02-6E7D-4601-BDA2-BFFAA68956BA"
#define CHARACTERISTIC_UUID0_2 "ADABFB03-6E7D-4601-BDA2-BFFAA68956BA"
#define CHARACTERISTIC_UUID0_3 "ADABFB01-6E7D-4601-BDA2-BFFAA68956BA"
#define SERVICE_UUID1 "558DFA00-4FA8-4105-9F02-4EAA93E62980"
#define CHARACTERISTIC_UUID1_0 "558DFA01-4FA8-4105-9F02-4EAA93E62980"

class MyServerCallbacks : public BLEServerCallbacks
{
  void onConnect(BLEServer *pServer)
  {
    deviceConnected = true;
  };

  void onDisconnect(BLEServer *pServer)
  {
    deviceConnected = false;
  }
};

class MyCallbacks : public BLECharacteristicCallbacks
{
  void onWrite(BLECharacteristic *pCharacteristic)
  {
    std::string rxValue = pCharacteristic->getValue();

    if (rxValue.length() > 0)
    {
      Serial.println("*********");
      M5.Lcd.println("*********");

      Serial.print("Received Value: ");
      M5.Lcd.println("Received Value: ");
      for (int i = 0; i < rxValue.length(); i++)
      {
        Serial.print(rxValue[i]);
        M5.Lcd.print(rxValue[i]);
      }
      Serial.println();
      M5.Lcd.println();
      Serial.println("*********");
      M5.Lcd.println("*********");
    }
  }
};

void setup()
{
  //Spoof Base Mac
  esp_base_mac_addr_set(spoofMac);
  M5.begin();       //Init M5Core.
  M5.Power.begin(); //Init Power module.
  M5.Lcd.setBrightness(200); //Set the screen brightness to 200 nits.
  M5.Lcd.setTextSize(2);     //Set the text size to 2.
  M5.Lcd.setTextColor(TFT_GREEN);
  Serial.println("Init Advertising...");
  M5.Lcd.println("Init Advertising...");

  // Create the BLE Device
  BLEDevice::init("Charge 2");

  // Create the BLE Server
  pServer0 = BLEDevice::createServer();
  pServer0->setCallbacks(new MyServerCallbacks());

  // Create the BLE Service
  BLEService *pService0 = pServer0->createService(SERVICE_UUID0);
  BLEService *pService1 = pServer0->createService(SERVICE_UUID1);

  // Create a BLE Characteristic
  pCharacteristic0_0 = pService0->createCharacteristic(
      CHARACTERISTIC_UUID0_0,
      BLECharacteristic::PROPERTY_READ);

  pCharacteristic0_1 = pService0->createCharacteristic(
      CHARACTERISTIC_UUID0_1,
      BLECharacteristic::PROPERTY_READ | BLECharacteristic::PROPERTY_WRITE_NR);

  pCharacteristic0_2 = pService0->createCharacteristic(
      CHARACTERISTIC_UUID0_2,
      BLECharacteristic::PROPERTY_NOTIFY | BLECharacteristic::PROPERTY_READ);

  pCharacteristic0_2->addDescriptor(new BLE2902());

  pCharacteristic0_3 = pService0->createCharacteristic(
      CHARACTERISTIC_UUID0_3,
      BLECharacteristic::PROPERTY_NOTIFY | BLECharacteristic::PROPERTY_READ);

  pCharacteristic0_3->addDescriptor(new BLE2902());

  pCharacteristic1_0 = pService1->createCharacteristic(
      CHARACTERISTIC_UUID1_0,
      BLECharacteristic::PROPERTY_NOTIFY | BLECharacteristic::PROPERTY_READ);

  pCharacteristic1_0->addDescriptor(new BLE2902());

  pCharacteristic0_1->setCallbacks(new MyCallbacks());

  // Start the service
  pService0->start();
  pService1->start();

  // Start advertising
  pServer0->getAdvertising()->start();
  Serial.println("Waiting a client connection to notify...");
  M5.Lcd.println("Waiting a client connection to notify...");
}

void loop()
{
  if (M5.BtnB.isPressed())
  {
    M5.Lcd.println("Going to sleep!");
    delay(5000);
    M5.Power.powerOFF();
  }
  // disconnecting
  if (!deviceConnected && oldDeviceConnected)
  {
    //give the bluetooth stack the chance to get things ready
    delay(500);
    pServer0->startAdvertising(); // restart advertising
    Serial.println("Restart Advertising...");
    M5.Lcd.println("Restart Advertising...");
    oldDeviceConnected = deviceConnected;
  }
  // connecting
  if (deviceConnected && !oldDeviceConnected)
  {
    // do stuff here on connecting
    oldDeviceConnected = deviceConnected;
  }
  M5.update(); //Read the press state of the key.
}
The above code matches the nRF Screen representation of the Fitbit Charge 2 exactly. So I attempt to initiate a pairing with the Android fitbit app and…
Nothing.
Apparently this isn’t enough to fool the app into connecting to the faked Fitbit.
And then my wife said she wanted a smart-watch for nursing school, which seemed like a way better use of the Fitbit than whatever the hell I was doing with it. So thus ended the Fitbit hacking saga…
Then she gave it back to me a few weeks later because it did not fit her need.
Starting Over
I knew that my wife had paired her iPhone with the watch and set up the app, so I assumed that she had updated the firmware of the watch as part of that process.
So I took a look…
The firmware version was the exact same as the previous blog post!
And then that brief moment of hope disappeared as I realized what had happened. My wife had paired and updated the firmware, but it was already the newest version when I gave it to her. Meaning of course, I’d screwed up somewhere along the way and let the firmware get updated.
Well… There goes the “intercept the firmware update process” idea out the window. So I switched to some other projects and just thought about how to get a foothold again for a while.
Then it hit me! I hadn’t started at the lowest level of the protocol.
I’d used the Fitbit app to initiate a connection and send pairing codes that did not match the 4 digits displayed on the watch, but the pairing code is not the earlierst step of the handshake process. Something has to make the watch display the values on the watch face in the first place.